Step By Step: Inking with Chinese Calligraphy Brushes
Hey everyone! It's been a while, but I've been too busy (god forbid) to draw so the blog didn't get updated in the meantime.
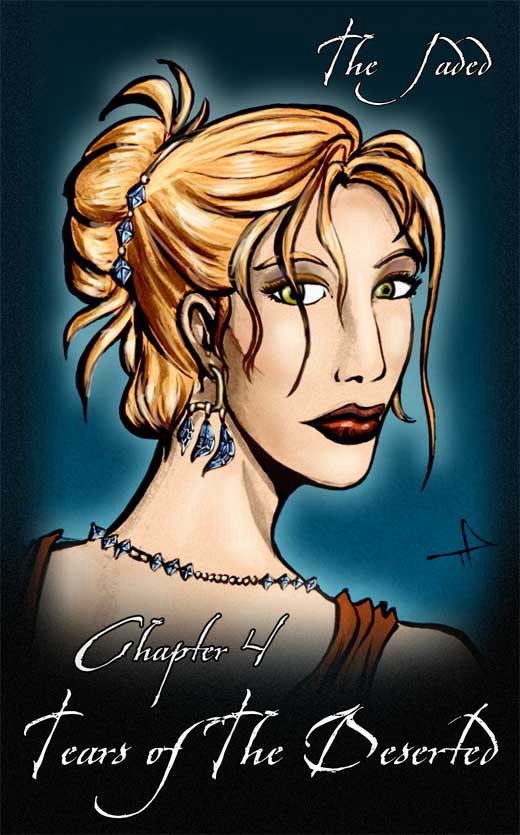
Today I'm making a cover for Chapter Four of The Jaded. It's been a custom for me to have a portrait of a different character for each cover, so we had Jade for Chapter One, Jin for Chapter Two, Doc Ice for Chapter Three... now it's Lysanne for Chapter Four.
The chapter name is "Tears of the Deserted" and there's some fun stuff in store as I get to draw lots of fancy-dress. I want Lysanne posing in fancy dress with a set of tanzanite jewelry.
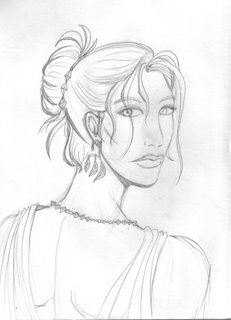
These are my pencils of the picture. You'll notice they're quite finished and clean. My friend Steve Bryant from Athena Voltaire once told me that best inking is done on good pencilling, and muddy, messy pencils are very difficult to ink, so I'm taking his advice as a philosophy to inking.
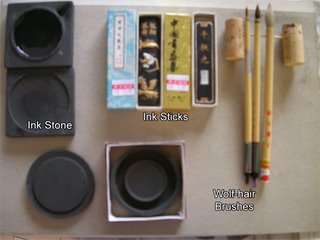
Let me introduce you to my new arsenal of inking tools. I like inking using brushes. Recently I switched from my usual sable brush and india ink setup to something closer to my roots: Chinese brushes and inks.
There are several reasons why I prefer the brushes and ink to their western counterparts.
Firstly, grindiing the ink sticks on ink stone to make ink everytime I want to ink may sound tedious, but I actually quite enjoy doing it. I'm told the process of grinding is supposed to calm you down and get you into the mood for writing/inking, but for me the main two advantages of this is 1) I can control how black I want the ink to be, which can be ridiculously black, and which my luckless india-ink counterparts have to resort to searching for super-black inks or drying out their ink bottles for. 2) My second advantage is I get fresh, new ink each time I ink. Anyone who has used india ink before should know that about half-way through the bottle, most india inks tend to "go off" after a few weeks/months, and start sedimenting (I hate it when that happens, it makes for horrible blotchy inking). With the sticks, I only make enough to use each time, so there's hardly any surplus left to go bad.
Secondly, the good chinese brushes, while larger at the base than the sable brushes, can retain just as sharp a point, and hold far more ink, making it easier to make long, smooth strokes as you need not dip the brush in as often. An added plus is that even the more expensive hair for the brush (xiao lang mau or wolf-hair) is still cheaper than sable. (Well, at least where I live). I guess they charge cut-thoat prices for these in America and Europe, but here they're literally a fraction of the price. Plus they actually have decent pencil-thick handles, instead of those ridiculously toothpick-thin ones. (Ok, I'm exaggerating, but you know what I mean).
It's worth noting that for any kind of brush inking, it's always worth investing in the best brush you can afford. For chinese brushes, steer clear of the goats-hair brushes. Those are horrible.
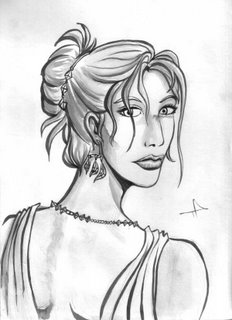
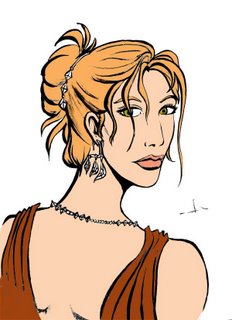
These are the results of my rough inking. As you can see, despite my best attempt to keep the paper clean, I smudged some ink across Lysanne's nose.
After scanning the image into Photoshop, I do some painting over (to get rid of the smudge) and some levels tweaking to emphasize the black and get rid of the paler greys. The lighter grey washes I use for shading,

I make a copy of the clean inks and do some further levels tweaking, so that the images becomes almost pure black and white. I'll use this layer for quick colouring (easier to paint-bucket), then toss it away when I'm done.
Going banzai with the paint-bucket, I quickly fill in the large spaces with flat areas of colour, using a brush to fill in any spots the bucket misses.
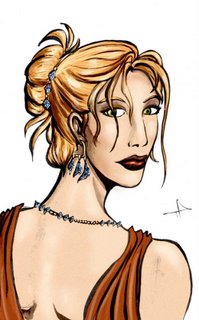
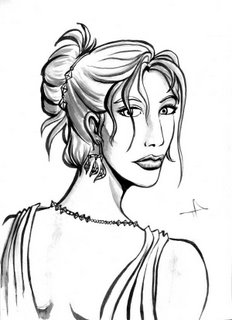
After that's we toss away the stark black-and-white layer, and superimpose the clean inks on top of the colours. I usually like to add a bit of colour and shading to this, and not to mention the high-lights. Note how alive the highlighting makes her hair look.

Add a frame, background and the text, and we're done.
Around this time I notice the mistakes in perspective and facial features in my original pencil, but it's rather late to do corrections now, which will be a pain and proves why Steve is right, it's always best to correct your mistakes at the pencil stage, and not when you've gotten to the end of the whole process!
Today I'm making a cover for Chapter Four of The Jaded. It's been a custom for me to have a portrait of a different character for each cover, so we had Jade for Chapter One, Jin for Chapter Two, Doc Ice for Chapter Three... now it's Lysanne for Chapter Four.
The chapter name is "Tears of the Deserted" and there's some fun stuff in store as I get to draw lots of fancy-dress. I want Lysanne posing in fancy dress with a set of tanzanite jewelry.

These are my pencils of the picture. You'll notice they're quite finished and clean. My friend Steve Bryant from Athena Voltaire once told me that best inking is done on good pencilling, and muddy, messy pencils are very difficult to ink, so I'm taking his advice as a philosophy to inking.
Let me introduce you to my new arsenal of inking tools. I like inking using brushes. Recently I switched from my usual sable brush and india ink setup to something closer to my roots: Chinese brushes and inks.

There are several reasons why I prefer the brushes and ink to their western counterparts.
Firstly, grindiing the ink sticks on ink stone to make ink everytime I want to ink may sound tedious, but I actually quite enjoy doing it. I'm told the process of grinding is supposed to calm you down and get you into the mood for writing/inking, but for me the main two advantages of this is 1) I can control how black I want the ink to be, which can be ridiculously black, and which my luckless india-ink counterparts have to resort to searching for super-black inks or drying out their ink bottles for. 2) My second advantage is I get fresh, new ink each time I ink. Anyone who has used india ink before should know that about half-way through the bottle, most india inks tend to "go off" after a few weeks/months, and start sedimenting (I hate it when that happens, it makes for horrible blotchy inking). With the sticks, I only make enough to use each time, so there's hardly any surplus left to go bad.
Secondly, the good chinese brushes, while larger at the base than the sable brushes, can retain just as sharp a point, and hold far more ink, making it easier to make long, smooth strokes as you need not dip the brush in as often. An added plus is that even the more expensive hair for the brush (xiao lang mau or wolf-hair) is still cheaper than sable. (Well, at least where I live). I guess they charge cut-thoat prices for these in America and Europe, but here they're literally a fraction of the price. Plus they actually have decent pencil-thick handles, instead of those ridiculously toothpick-thin ones. (Ok, I'm exaggerating, but you know what I mean).
It's worth noting that for any kind of brush inking, it's always worth investing in the best brush you can afford. For chinese brushes, steer clear of the goats-hair brushes. Those are horrible.

These are the results of my rough inking. As you can see, despite my best attempt to keep the paper clean, I smudged some ink across Lysanne's nose.

After scanning the image into Photoshop, I do some painting over (to get rid of the smudge) and some levels tweaking to emphasize the black and get rid of the paler greys. The lighter grey washes I use for shading,

I make a copy of the clean inks and do some further levels tweaking, so that the images becomes almost pure black and white. I'll use this layer for quick colouring (easier to paint-bucket), then toss it away when I'm done.

Going banzai with the paint-bucket, I quickly fill in the large spaces with flat areas of colour, using a brush to fill in any spots the bucket misses.

After that's we toss away the stark black-and-white layer, and superimpose the clean inks on top of the colours. I usually like to add a bit of colour and shading to this, and not to mention the high-lights. Note how alive the highlighting makes her hair look.
Add a frame, background and the text, and we're done.
Around this time I notice the mistakes in perspective and facial features in my original pencil, but it's rather late to do corrections now, which will be a pain and proves why Steve is right, it's always best to correct your mistakes at the pencil stage, and not when you've gotten to the end of the whole process!
posted by Ping @ Phalanx @ 9:09 PM
![]()


0 Comments:
Post a Comment
<< Home